
Three FM27 tactics that hold up in the 2026/27 match engine, with full roles, duties, instructions and the squads each one suits.
FM27 best tactics
There is no single best tactic in FM27, because the effectiveness model scores your plan against your players. A system that wins the Champions League with a technical squad will score badly in League Two. What does exist is a small set of shapes that are efficient at each level, and three of them cover most saves.
Each system below is complete: shape, roles, duties, team instructions and the tweaks to use when the match state changes. Start with the one that matches your squad, not the one that matches your ambition.
System 1: the controlled press (4-2-3-1)
The default for a mid-table top-five league side. It presses, but from a mid block, so the back four is not exposed every time the press is beaten.
| Role | Duty | Player type |
|---|---|---|
| Sweeper keeper | Defend | Comfortable with the ball, decent acceleration |
| Right back | Support | Balanced, can cross |
| Centre-back | Defend | Aggressive, good in the air |
| Centre-back | Defend | Faster of the two, covers behind |
| Left back | Support | Energetic, good stamina |
| Defensive midfielder | Defend | Positioning, anticipation |
| Central midfielder | Support | Passing, vision, work rate |
| Attacking midfielder | Support | Close control, decisions |
| Right winger | Support | Pace, dribbling, crossing |
| Inside forward | Attack | Finishing, off the ball |
| Advanced forward | Attack | Pace, finishing, movement |
Instructions. Positive mentality. Standard passing, standard tempo, fairly wide. Work ball into box. Mid block, standard defensive line, trigger press on the touchline. Counter on, distribute quickly to the flanks.
Why it works. The double pivot protects the centre, the attacking midfielder links the striker without isolating him, and the inside forward on the left gives you a runner in behind while the right winger holds width. The shape is balanced enough that the effectiveness gauge stays high even with average players.
Weakness. A very deep low block can starve the striker. Switch the attacking midfielder to attack and the left back to support if you are chasing a game.
System 2: the high press (4-3-3)
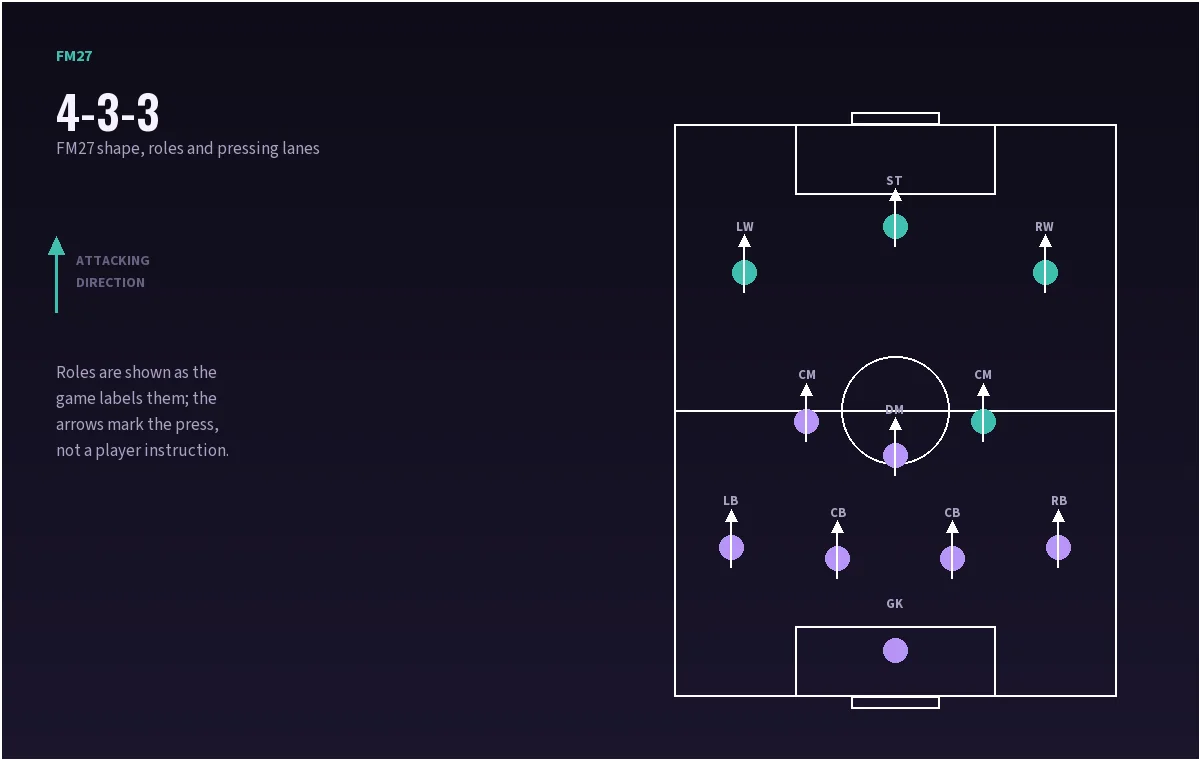
The system for a squad with legs. It is expensive in effectiveness and in injuries, and it is the best route to dominating a weaker opponent.
| Role | Duty | Player type |
|---|---|---|
| Sweeper keeper | Support | Quick off the line |
| Right back | Support | Stamina, crossing |
| Centre-back | Defend | Fast, aggressive |
| Centre-back | Defend | Positioning, heading |
| Left back | Support | Stamina, tackling |
| Defensive midfielder | Defend | Anticipation, positioning |
| Central midfielder | Attack | Arrives in the box, finishing |
| Box-to-box midfielder | Support | Work rate, stamina, passing |
| Right winger | Support | Pace, dribbling |
| Inside forward | Attack | Finishing, movement |
| Pressing forward | Attack | Work rate, pace, aggression |
Instructions. Positive mentality. Slightly shorter passing, higher tempo, fairly wide. Pass into space. High press, high defensive line, prevent short GK distribution. Counter-press on, counter on.
Why it works. Three forwards press in a line, the midfield three covers the second ball, and the high line compresses the pitch. The pressing forward is the trigger: if he has low work rate, the whole system collapses.
Weakness. Balls over the top. A high line with slow centre-backs is a goal waiting to happen. Drop the line to standard against fast strikers, and accept the lower press.
The high press costs condition. With fewer than 22 senior players and a busy December, you will lose the season to injuries. Rotate the two wide forwards first.
System 3: the low-block counter (3-4-2-1)
The system for a newly promoted side, a lower-league save, or any match where you are the underdog.
| Role | Duty | Player type |
|---|---|---|
| Sweeper keeper | Defend | Shot-stopping first |
| Centre-back | Defend | Aerial, aggressive |
| Centre-back | Defend | Sweeper, reads the game |
| Centre-back | Defend | Mobile, covers wide |
| Right wing-back | Support | Stamina, crossing |
| Left wing-back | Support | Stamina, crossing |
| Defensive midfielder | Defend | Positioning, tackling |
| Central midfielder | Support | Passing, work rate |
| Attacking midfielder | Support | Close control, decisions |
| Attacking midfielder | Attack | Finishing, movement |
| Advanced forward | Attack | Pace, hold-up play |
Instructions. Cautious or balanced mentality depending on the opponent. Direct passing, higher tempo, fairly narrow. Low block, standard line, drop off. Counter on, distribute quickly, hold shape after losing the ball.
Why it works. Five at the back absorbs crosses, the two tens counter through the middle, and the direct passing finds the striker before the opponent's shape resets. It is cheap in tactical complexity, so a limited squad can execute it immediately.
Weakness. You will concede possession and shots. The keeper needs to be the best player in the team, and the two tens need stamina to run both ways.
Choosing between them
| Your situation | System | Why |
|---|---|---|
| Top-five league, mid-table | Controlled press | Balanced risk, high floor |
| Title challenge with a deep squad | High press | Dominates weaker teams |
| Newly promoted | Low-block counter | Cheap, stable, suits limited players |
| Lower league | Low-block counter | Direct football works |
| Squad with no number ten | High press 4-3-3 | Removes the ten |
| Squad with slow defenders | Controlled press | Mid block protects them |
If you are unsure, start with the controlled press. It has the fewest failure modes and the formations page explains how to shift it into a 4-3-3 without changing the squad.
Player instructions that are worth the complexity
Keep these to three or four across the team.
- Wingers: stay wider, to hold the flank while the full-back overlaps.
- Inside forward: cut inside with the ball, to attack the half-space.
- Defensive midfielder: hold position, so the back four is never exposed.
- Pressing forward: close down more, to trigger the press.
- Centre-back in a high line: step up more, to compress the space behind midfield.
Anything beyond that is usually a team instruction in disguise. The tactics guide explains the complexity budget in detail.
Match management
A tactic is not finished at kick-off. The three levers that matter:
Tweaks. Overload a flank for ten minutes, then cancel it. Push the keeper up only for a late set piece. Switch the front three if the opponent's full-backs are dominating.
Shouts. Praise at half-time if you are ahead and playing well; demand more if you are passive; calm down if the game is frantic. Do not repeat the same shout every ten minutes.
Substitutions. The high press needs fresh legs on the wings by the 65th minute. The low block needs fresh legs at wing-back, where the running is heaviest.
Training the system
Set match preparation to the system you are using and train the behaviours it needs: pressing for the high press, defensive shape for the low block, attacking movement for the controlled press. The training guide has a weekly template that fits around a two-match week.
What to check after ten matches
If the tactic is working, the effectiveness gauge sits above the halfway mark, the team creates chances from the areas you intended, and the goals conceded come from individual errors rather than structural gaps.
If it is not, change one thing: the defensive line, the pressing trigger, or the duty of the most isolated player. Changing three at once tells you nothing. The Tactical Effectiveness guide explains which pillar is likely to be the problem.
Sources
More Football Manager 27 Guides
The FM27 free agent list worth signing: 34 players without a club, their ages, positions and what each one still does well.
Manage in FM27's lower leagues: part-time contracts, free transfers, simple tactics, squad size and the promotion plan that survives League One.
Football Manager 27 costs £49.99, €59.99 or $59.99, with 10% off for pre-purchase. What the discount covers and what it does not.
Football Manager 27 releases on 10 November 2026. Here is how the global unlock works, when your region flips, and what opens earlier.
Set up FM27 scouting properly: assignments, scout attributes, recruitment focuses, report reading and the shortlist that finds wonderkids first.
FM27 corner routines, free-kick delivery and defensive set-piece setup, with a near-post routine you can build in five minutes.
Which FM27 staff attributes actually matter: coaching stars, workload, physios, set-piece coaches and the backroom hires that move the numbers.
Minimum and recommended FM27 PC specs, the laptop chips that qualify, Mac support and what to upgrade first if your machine struggles.